
Flutter Hexcolor: Using Hexadecimal Color Strings in Flutter

This article was originally published on the Waldo blog.
Introduction
Colors serve an important function in life. We use colors to signal important information, like with traffic lights, for example. A red light means stop and a green light means go. In addition to signaling important information, colors are used for self-expression, cultural identity, and national identity.
Since colors play an important role in everyday life, when designing an app it’s important to consider your use of color carefully. The colors in your app need to be in line with your brand, and also with people’s general understanding of colors. For example, a reddish button would be used for something like deleting a record to signal that this is a dangerous operation that cannot be undone.
In this tutorial we will
- discuss various models used to define colors
- explain what hexadecimal numbers are
- learn how to create an instance of the Color class in Flutter
- build a demo app to apply what we have learned.
Color Models
Color models are used to define colors. You can think of this as specifying the address of the color within a coordinate system.
The most common color model is RGB. In this model, the color is a combination of a red value (R), a green value (G) and a blue value (B). Each value ranges from 0 to 255. Therefore, when using the RGB color model, the total number of possible colors is 256 * 256 * 256, which is about 16.7 million colors.
Another color model that you may have come across is HSV, which stands for hue (H), saturation (S) and value (V). Artists sometimes prefer this because it’s a more natural way of thinking about colors.
Finally, for printing, colors are defined using the CMYK model. This defines colors by combining cyan (C), magenta (M), yellow (Y) and black (K). In contrast to RGB, CMYK is subtractive. In other words, we consider what colors must be subtracted from white to get the desired result. This makes sense, given that when printing on paper, the paper is often white and we need to block the reflection of certain colors. In contrast, in RGB, we consider what colors must be added to black to get the desired result. This also makes sense, given that we start with a black screen and then light up pixels to get the desired color.
Hexadecimal Color Strings
In the previous section, we described the different color models. In this section, you’ll learn how to convert an RGB color into a hexadecimal string.
Flutter uses the RGB model, but when defining the numbers from 0 to 255, we need to convert them into hexadecimal. Hexadecimal is a common notation used in software for defining colors.
Hexadecimal is another name for base 16. In normal, everyday life, we use base 10. This means that each position, or single character, can represent any of 10 different values (i.e. 0,1,2,..,9).
In hexadecimal, each position, or character, in the number can represent any of 16 different values. At this point, you might be wondering how to convert 10,11,12,13,14,15 into single characters. In order to achieve this, we use the letters A, B, C, D, E, and F. Therefore, the number 0F in hexadecimal is 15 in decimal. The next number, 16 in decimal, is 10 in hexadecimal. Furthermore, the biggest number in the RGB model, 255 in decimal, is FF in hexadecimal.
Armed with this knowledge, we can now turn any RGB value into a sequence of 6 characters. To do this, we start with the two hexadecimal characters for red, then the two for green and lastly the two for blue. For example, yellow, which is a mixture of red and green with no blue, would be FFFF00. The first FF means 100% red, the second FF means 100% blue, and the last 00 means 0% blue.
The Flutter Color Class
Flutter provides a class named Color for specifying custom colors. In addition to RGB values, when creating a Color instance you also need to specify a value for alpha. Alpha defines how opaque the color is, where 255 means completely opaque and 0 means completely transparent.
When creating an instance of the Color class, you pass into it a single number in hexadecimal in the format AARRGGBB, where AA is the alpha number in hex and RRGGBB is the RGB value in hex. To let the computer know that this is a hexadecimal number, we place 0x at the start. Therefore, to create a green color we use the syntax Color(0xFF00FF00) as in the code snippet below. Note that the first FF represents the alpha; in this case it means completely opaque.
Color c = const Color(0xFF00FF00);Our Demo App
Let’s now create an app to apply what we’ve learned. We’ll build on the concept of a smart home lighting app, introduced in my previous post: Flutter Checkbox Tutorial: How to Create and Use a Checkbox. In that tutorial, we built an app that lets you turn lights in your house on and off. We’ll take it a step further and enable each light bulb to have a custom color!
This demo app does not depend on any third party libraries; therefore, you can use DartPad to follow along. DartPad is a web based editor where you can try out Flutter code without the need to install anything on your computer. To follow along in this tutorial head over to https://dartpad.dev/
Below is what the final app will look like.
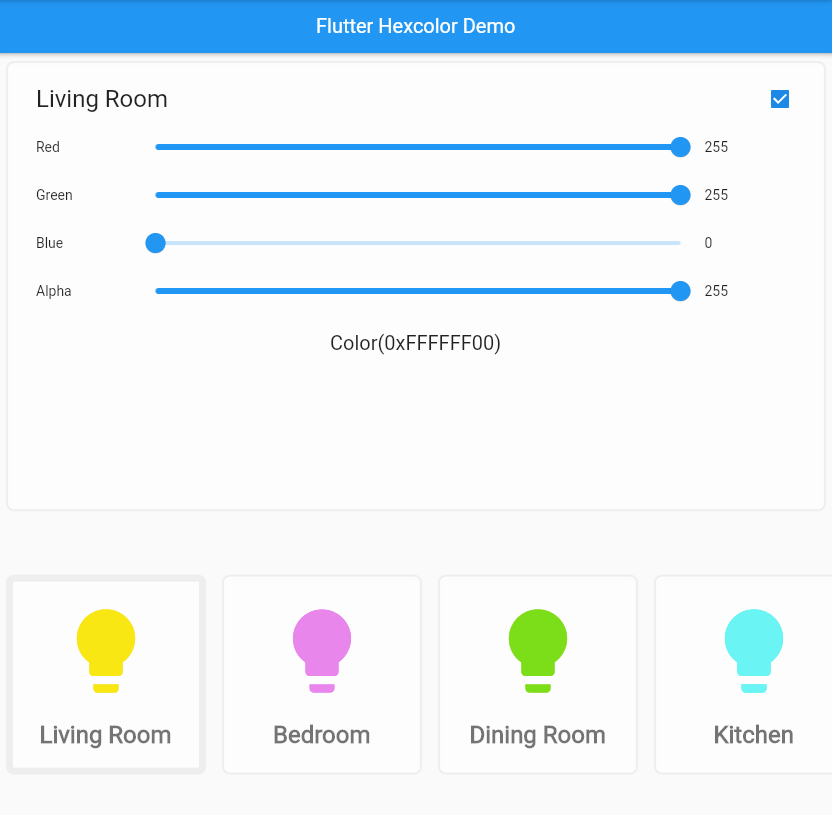
Step 1: Create the LightBulbState Class
The LightBulbState class is the heart of our app. We use this to hold the on/off state of a bulb and its color value. We also provide convenience methods to get the bulb color in a hexadecimal string format, or in an integer format that we can use in the constructor of the Color class.
Paste the code below into your DartPad editor.
Notice how we use the method toRadixString(16) to convert our int into a hexadecimal string. Also note that we need to pad each hexadecimal string with “0” characters in case the hexadecimal conversion only provides one character. This is important because each hexadecimal string needs to be exactly two characters long.
class LightBulbState {
  bool on;
  int redValue;
  int greenValue;
  int blueValue;
  int alphaValue;
  LightBulbState(
      {this.on = true,
      this.redValue = 255,
      this.greenValue = 255,
      this.blueValue = 0,
      this.alphaValue = 255});
  String hexString() =>
      '${alphaValue.toRadixString(16).padLeft(2, '0')}' +
      '${redValue.toRadixString(16).padLeft(2, '0')}' +
      '${greenValue.toRadixString(16).padLeft(2, '0')}' +
      '${blueValue.toRadixString(16).padLeft(2, '0')}';
  int hexIntValue() {
    return int.parse(hexString(), radix: 16);
  }
}
Step 2: Create the LightBulbCard Widget Class
The LightBulbCard widget class represents each bulb in graphical form on the screen. It converts a LightBulbState into a widget.
Paste the code below into your DartPad editor.
Notice that if the LightBulbCard is the currently selected widget, then it has a slightly thicker border. To achieve this, we have included a boolean variable named selected. In the BoxDecoration we conditionally apply a border of thickness 7.0 if selected is true, otherwise the border thickness is 2.0.
class LightBulbCard extends StatelessWidget {
  const LightBulbCard(
      {this.room = 'Room Name', this.bulbState, this.selected = false});
  final String room;
  final LightBulbState? bulbState;
  final bool selected;
  @override
  Widget build(BuildContext context) {
    return Container(
      decoration: BoxDecoration(
        border:
            Border.all(color: Color(0xffeeeeee), width: selected ? 7.0 : 2.0),
        color: Colors.white38,
        borderRadius: BorderRadius.all(Radius.circular(8.0)),
        boxShadow: [
          BoxShadow(
            color: Colors.white10,
            blurRadius: 4,
            spreadRadius: 2,
            offset: Offset(0, 2),
          ),
        ],
      ),
      margin: EdgeInsets.all(8),
      height: 200,
      width: 200,
      child: Column(
        mainAxisAlignment: MainAxisAlignment.center,
        children: [
          Center(
              child: Icon(
            Icons.lightbulb,
            size: 100.0,
            color:
                bulbState!.on ? Color(bulbState!.hexIntValue()) : Colors.grey,
          )),
          SizedBox(
            height: 20.0,
          ),
          Text(
            room,
            style: TextStyle(
                fontWeight: FontWeight.bold,
                fontSize: 24.0,
                color: Colors.black54),
          ),
        ],
      ),
    );
  }
}
Step 3: Create the ColorSlider Widget Class
The ColorSlider widget is what we use to display the slider for the red, green, blue, and alpha values.
Paste the code below into your DartPad editor.
Notice how this is a StatelessWidget and that requires users to pass in a callback function to be executed when the value of the slider changes. In a later step, you’ll see how we pass in a callback function that updates the associated LightBulbState.
class ColorSlider extends StatelessWidget {
  const ColorSlider({
    Key? key,
    required this.colorTitle,
    required this.colorValue,
    required this.onColorValueChange,
  }) : super(key: key);
  final String colorTitle;
  final int? colorValue;
  final Function(double) onColorValueChange;
  @override
  Widget build(BuildContext context) {
    return Padding(
      padding: const EdgeInsets.fromLTRB(16.0, 0, 12.0, 0),
      child: Row(
        children: [
          Expanded(
            child: Text(colorTitle),
            flex: 1,
          ),
          Expanded(
            child: Slider(
              value: colorValue!.toDouble(),
              min: 0,
              max: 255,
              label: colorValue!.round().toString(),
              onChanged: onColorValueChange,
            ),
            flex: 6,
          ),
          Expanded(
            child: Text(colorValue.toString()),
            flex: 1,
          )
        ],
      ),
    );
  }
}
Step 4: Build the Main App Shell
Now that we’ve created the key components of our app, let’s bring them all together into a complete working app.
Paste the code below at the top of your DartPad editor.
When you run the app now, you should see a simple homepage with the text “Flutter Hexcolor Demo” in the center.
import 'package:flutter/material.dart';
void main() {
  runApp(MyApp());
}
class MyApp extends StatelessWidget {
  @override
  Widget build(BuildContext context) {
    return MaterialApp(
      theme: ThemeData.light(),
      debugShowCheckedModeBanner: false,
      home: MyHomePage(title: 'Flutter Hexcolor Demo'),
    );
  }
}
class MyHomePage extends StatefulWidget {
  final String title;
  MyHomePage({this.title = 'Demo'});
  @override
  _MyHomePageState createState() => _MyHomePageState();
}
class _MyHomePageState extends State<MyHomePage> {
  @override
  Widget build(BuildContext context) {
    return Scaffold(
      appBar: AppBar(
        title: Text(widget.title),
      ),
      body: Center(
        child: Container(
          child: Text('Flutter Hexcolor Demo'),
        ),
      ),
    );
  }
}
Step 5: Add the State Variables
In this step, we’ll add the variables that store the state of the app into the MyHomePageState class.
In this app, one room is selected at a time, which is stored in the selectedRoom variable. We store the LightBulbState for each room in the lightSwitches variable.
Notice that we have also overridden the initState() method; this is where we set the selected room to be the first room on our list when the app loads.
class _MyHomePageState extends State<MyHomePage> {
  String? selectedRoom;
  Map<String, LightBulbState> lightSwitches = {
    'Living Room': LightBulbState(),
    'Bedroom': LightBulbState(),
    'Dining Room': LightBulbState(),
    'Kitchen': LightBulbState(),
    'Entrance': LightBulbState(),
  };
  @override
  void initState() {
    selectedRoom = lightSwitches.keys.first;
    super.initState();
  }
...
Step 6: Build Out the App Body
The final step in constructing our app is to insert the user interface components into the body of the app. Update the Scaffold body with the code below.
Notice how we use the ColorSlider and LightBulbCard widget classes.
The top part of the screen shows the state of the currently selected room. We wrap each LightBulbCard with a GestureDetector so that when a user taps the selected room, it becomes the room associated with that LightBulbCard.
body: Column(children: [
          Expanded(
              child: Container(
                width: double.maxFinite,
                padding: EdgeInsets.all(12.0),
                margin: EdgeInsets.all(8.0),
                decoration: BoxDecoration(
                  border: Border.all(color: Color(0xffeeeeee), width: 2.0),
                  color: Colors.white38,
                  borderRadius: BorderRadius.all(Radius.circular(8.0)),
                  boxShadow: [
                    BoxShadow(
                      color: Colors.white10,
                      blurRadius: 4,
                      spreadRadius: 2,
                      offset: Offset(0, 2),
                    ),
                  ],
                ),
                child: Column(
                  children: [
                    CheckboxListTile(
                      title: Text(
                        selectedRoom!,
                        style: TextStyle(fontSize: 24.0),
                      ),
                      value: lightSwitches[selectedRoom]?.on,
                      onChanged: (bool? value) {
                        setState(() {
                          lightSwitches[selectedRoom]?.on = value!;
                        });
                      },
                    ),
                    ColorSlider(
                        colorTitle: 'Red',
                        colorValue: lightSwitches[selectedRoom]!.redValue,
                        onColorValueChange: (double value) {
                          setState(() {
                            lightSwitches[selectedRoom]!.redValue =
                                value.round();
                          });
                        }),
                    ColorSlider(
                        colorTitle: 'Green',
                        colorValue: lightSwitches[selectedRoom]!.greenValue,
                        onColorValueChange: (double value) {
                          setState(() {
                            lightSwitches[selectedRoom]!.greenValue =
                                value.round();
                          });
                        }),
                    ColorSlider(
                        colorTitle: 'Blue',
                        colorValue: lightSwitches[selectedRoom]!.blueValue,
                        onColorValueChange: (double value) {
                          setState(() {
                            lightSwitches[selectedRoom]!.blueValue =
                                value.round();
                          });
                        }),
                    ColorSlider(
                        colorTitle: 'Alpha',
                        colorValue: lightSwitches[selectedRoom]!.alphaValue,
                        onColorValueChange: (double value) {
                          setState(() {
                            lightSwitches[selectedRoom]!.alphaValue =
                                value.round();
                          });
                        }),
                    Center(
                      child: Padding(
                        padding: const EdgeInsets.all(16.0),
                        child: Text(
                          'Color(0x' +
                              lightSwitches[selectedRoom]!
                                  .hexString()
                                  .toString()
                                  .toUpperCase()+')',
                          style: TextStyle(fontSize: 20.0),
                        ),
                      ),
                    )
                  ],
                ),
              ),
              flex: 3),
          Expanded(
              child: SingleChildScrollView(
                scrollDirection: Axis.horizontal,
                child: Row(
                  children: lightSwitches.keys
                      .map((roomName) => GestureDetector(
                          child: LightBulbCard(
                            room: roomName,
                            bulbState: lightSwitches[roomName],
                            selected: roomName == selectedRoom,
                          ),
                          onTap: () {
                            setState(() {
                              selectedRoom = roomName;
                            });
                          }))
                      .toList(),
                ),
              ),
              flex: 2),
        ])
Step 7: Test the Complete App
You should now have a fully working app. Play around with it and make sure everything works as expected. Think of both common usage scenarios and edge cases. It’s important to test your app thoroughly. If you get stuck, you can refer to the full code listing here: https://dartpad.dev/34ddf31ba4aa100a83e40f9a56d8e393
Conclusion
We’ve gone through how to create and use hexadecimal color strings in Flutter. You learned about different color models and how to define RGB colors using hexadecimal strings. We applied this knowledge in our home automation demo app to enable users to adjust the color of the lights in each room. Now that you’ve learned how colors work in Flutter, you can use this knowledge to improve the user experience of your apps.
If you want to learn more, a lot of useful content can be found on the Waldo. There, you’ll find content on mobile design, mobile engineering, QA & testing, and more.
